Welcome to the future of hassle-free e-invoicing!
With Odoo e-invoicing’s unique integration with Bizzi Invoice technology and MyInvois, your business will have no trouble streamlining its e-invoice processing processes in a compliant and time-saving manner. While words can only convey so much, experiencing our process firsthand will demonstrate its true effectiveness.
Let’s get started!
Overview
E-invoicing has become, and will continue to be, mandatory in Malaysia. As you navigate the e-invoicing flow with your existing ERP system, it’s beneficial to experience each step of bringing essential invoice data into the ERP system. This allows you to understand how real-time information is transmitted between Odoo and MyInvoicing. That’s the goal of this trial version.
Why is this user guide important? In Malaysia, every company is issued a unique key by the government to facilitate e-invoicing through MyInvoicing. Correctly configuring this key in Odoo is crucial for real-time data synchronization. This guide will walk you through the steps to configure your key, enabling full integration between MyInvoicing and Odoo, so you can take full control of your e-invoicing process.
Let’s dive into the setup. But firstly, watch this video for a more comprehensive view about how to use Odoo e-invoicing in a right way: A1 Consulting - E-invoicing User Guideline 1st Edition (youtube.com)
Step-by-step Process User Guide For You
-------------------------------------------------------------------------------------------------------------
1. MyInvois Configuration Setup
The first thing to do for a smooth integration between MyInvois and Odoo for e-invoicing: configure user permissions and set up the correct API connection.
a. User Permission Setup
Before you begin, make sure you are logged into the Odoo e-invoicing trial system, and have permission to manage system settings. Configuring the correct roles will ensure that the right people have access to view and issue e-invoicing.
*Precondition: Login and have the Administration/ Settings permission group.
Steps to set up user permissions:
- Step 1: Go to Settings > Users & Companies > Users Menu
- Step 2: Click a user who is responsible for issuing an e-invoice and “Edit”

- Step 3: Select a group user on the MyInvois field

- MyInvois/User: Only view E-Invoice Request and Individual E-invoice of their POS
- MyInvois/Admin: View all records and screens in MyInvois module: E-Invoice Request, Individual E-invoice, Consolidated Order, Consolidated E-invoice, Configuration, Logs
- Step 4: Save

MyInvois/Admin view & function

MyInvois/User view & function
b. API Connect Setup
This feature allows the Admin role to input necessary credentials such as URL and Client ID to obtain an access token from the MyInvois API. This screen must be configured by the admin role before any e-invoice can be issued.
*Precondition: Login with a user have MyInvois/Admin permission group
- Step 1: Go to MyInvois > Configuration > API Connect Setup
- Step 2: Click the “Create” button to create a new connect

- Step 3: Enter the following information

Parameter | Type | Description | Value Example | Requirement |
API URL | String | API link supply by MyInvois | Mandatory | |
Env Base URL | String | Link to MyInvois portal | Mandatory | |
Client ID | String | Client ID for the ERP system | Mandatory | |
Client Secret | String | Client secret for the ERP system | Mandatory | |
Grant Type | String | Must be “client_credentials” | client_credentials | Mandatory |
Scope | String | Optional parameter asking for a specific access scope. In case of external access to e-Invoice APIs, this parameter can be omitted. | InvoicingAPI |
Optional |
- Step 4: Click the “Get Access Token” button
- Successful: System return value on Access Token field
- Fail: Recheck fields info
2. Setup Instruction
-------------------------------------------------------------------------------------------------------------
a. Product Classification Code Declaration
- Step 1: Access to Inventory > Configuration > Product Categories

- Step 2: Click one product category, click the “Edit” button

- Step 3: Add or modify “classification code” follow this table: classification-codes

b. Set Country Code
- Step 1: Access to Contacts > Configuration > Country State

- Step 2: Add or modify the “country code” field follow this table: Countries Code

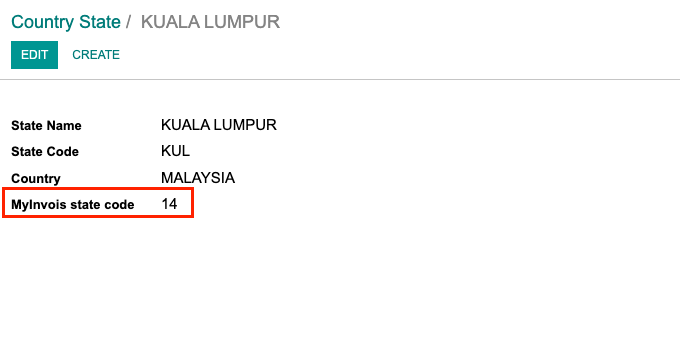
c. Set State Code
- Step 1: Access to Contacts > Configuration > Country State

- Step 2: Click on a state record

- Step 3: At the states section, click on a record and edit field MyInvois state code field

d. Malaysia Standard Industrial Classification Code Settings
- Step 1: Access Contacts > Search for a contact (being used for self-billed e-invoice as supplier)
- Step 2: Declare industrial classification code for the chosen contact follow this table: msic-codes

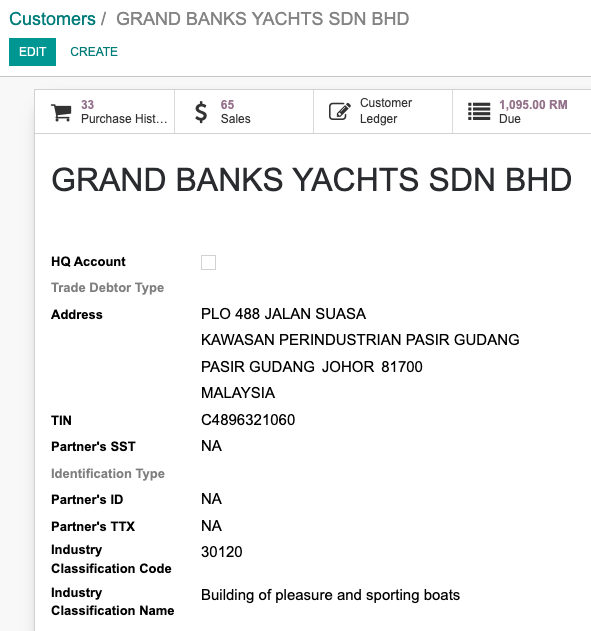
e. Set Contact General Information (TIN, ID, SST, TTX)
- Step 1: Access to Contacts, create new or select an existing contact

- Step 2: Input necessary information, please take notice on:
- TIN
- Partner’s SST: If this contact doesn’t register for SST, input “NA”
- Identification Type: ID’s Type
- Partner’s ID: ID number
- Partner’s TTX: If this contact doesn’t register for TTX, input “NA”
After that, you’ve completed the key to sync MyInvois with your Odoo.
Conclusion
By following this guide, you’ve gained the essential knowledge to configure your unique key and synchronize Odoo with MyInvoicing for seamless e-invoicing. Now, it’s time to put this into practice. Take the next step by applying these instructions to your system and experience firsthand how real-time e-invoicing can transform your operations.
